Showing posts with label boy. Show all posts

Thursday, June 2, 2016

C gets a desk now too!

My neighbor offered me an old oak desk if I wanted it for either of my kids. When I went to look at it, I was shocked at what great condition it was in. It looked brand new, all the drawers rolled smooth and it it solid! Of course I wanted it! 


C has been asking for a desk since I was looking at desks for L. He has also been planning what color he wanted me to paint it.


This desk was quite fun to work on. There were no little cracks that I had to remove paint from first, I got to get right down to sanding and filling all the oak grain.


If you do this yourself, buy a fresh container of DAP Latex Plastic Wood. Mine was a little dried out, which made it really difficult to put on and it didn't get into the grain as well. I bought a new one and it went in much better.


C wanted a black desk, so I talked him into a dark gray desk with an almost black top. I went with an ebony stain and used spray paint on the desk. I wanted to try the mat spray over it, but I wasn't sure how it would turn out so I left it shinny. C choose the red chair.


We are slowly adding things to his walls now. Finally after 4 years in this house. 


If his room was a little cleaner, I would take pictures from far away. Here is his wall that we added stripes to, remember from this post to lighten up the room. He wanted that so bad, I couldn't understand why he wanted a black desk.


C picked out all the signs for his walls.


Hopefully he can keep his shelves a little nicer and not so cluttered. He is my organized pack rat.

Kristen

Monday, August 31, 2015

Bible Covers


L has been asking for a real bible for the last month so I finally took her to pick one out. When we were there, they both wanted bible covers, but I didn't want to spend $25 on a cover each. I told them I would make some and they were ok with that. I found a ton of really cute ones on pintrest that were simple and both kids liked. Then we went to JoAnn's and they both decided they wanted zippers and pen holders. No matter how much I told them how cute the other ones were, they were insistent they really wanted to zip up their bibles. So, back to searching for a good tutorial. Sure, I could figure it out, but it wouldn't turn out quite as good as if I followed directions or it might have taken me a few tries. I really didn't want to do that.

I found this tutorial by Tracy's Treasury. It was perfect! It was exactly what I was looking for and almost everything was sewn on a surge. I love using my serger!

After both kids picked out their fabric, I went to work on their covers. Little C wanted his cover to match his bible exactly. I came up with this, not quite exactly, but pretty darn close.


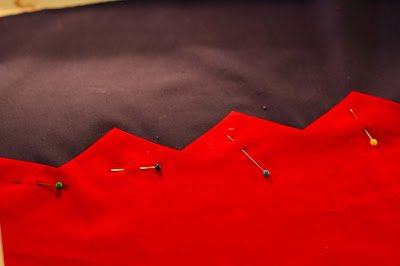
I thought I'd show you how to do the zig zags. It's really quite simple. You just basically cut straight across, then cut slits in at the top. Fold those slits down like the picture...


And iron them...


Here is the other side.


Pin it onto the fabric you want to sew it to and top stitch right along the edge.


Little C was very specific about wanting a pen holder.


For the zipper, I needed some interfacing to make it a little more sturdy. I didn't want to use anything toxic and I try to stick with 100% cotton fabric so I found this 100% cotton interfacing. I don't know much about the glue and how toxic that is, but at least the fabric is good.


Happy boy, all done!


L wanted a pen holder also. I made it a little big though. 


Since her bible is so tiny, it was harder to sew the zipper on. The back side turned out a little better. The front looks a little crooked on the corner where the zipper is. On both their bibles, I made the outside pockets a bit too small, I think. But, the kids don't think so and that's all that matters.


Now that I got my experience on C & L's bible covers, I needed one for myself.


I was very happy with the way mine turned out. On C's I learned that the zipper needs to be a thin robe zipper. That is much easier to sew through and I didn't break as many needles.


I ran into one little problem, I didn't have enough fabric to make the zipper part wide enough. I really didn't want to go back to the store to buy 5 1/2 inches of fabric, wash it and re-cut it, so I added a bit of the coordinating fabric instead. I actually really like the way it turned out. I wouldn't have wanted the grey next to the white zipper, but that little bit on the edge was perfect. You can look back up at the first picture to see how it looks from the top.

My cover is roomy enough to fit my bible study book and some extra papers.


It's always fun to have a little sewing project!

Kristen

Sunday, February 26, 2012

100 Days of Kindergarten

100 days of school is a BIG deal in kindergarten. The kids count many thing of 100 in many different way. It's a big celebration. This year in preparation for 100 days C's teacher assigned the kids all to gather 100 of something of their choice. C choose 100 of his favorite fabrics sewn together into a very soft blanket.


C loves different textures, especially soft. His favorite things to wear are his "soft pants" if it is cold out and all his shirts have to be very soft. So, as you can see, his fabric is all very soft.


C cut all the pieces himself, put them in the order he wanted and sewed them together. I helped guide them because he was using the surger and I was a little nervous to let him do that completely himself.


After he shared his blanket with his class, C got to bring it home and snuggles with it every night now.


Thursday, February 2, 2012

Dad approved boy pants

I finally did it! I made boy pants that Mr. C doesn't say are too girly. He finally said it, "they look nice." I can't believe it. :-) You can check out some of my other attempts here and here.

C loves soft pants and it has been cold so I finally went to get some sweatshirt fabric and made some pants. C and L now have their own fabric scissors and decided to make themselves a little something also. I had to sew some elastic on for them, but they did the rest. I was told specifically where to sew the elastic also.


C loves the pants but said the pockets are too low. I'm still working on perfecting the pockets. The trick to the pants for me was to make them very straight all the way down. No tapering around the knees or ankles. Also, I needed to make them wide at the waist. I always seemed to make them too narrow before.


The camo pants were the second pair I made and those pockets were better, but they still have a tendency to pop out like puppy dog ears. Maybe I should just make them a little smaller.


Can you tell, I cut the pants the wrong way on the fabric? I was thinking it wouldn't matter with camo, but they do look sideways to me.

Tuesday, January 24, 2012

Robes

It gets freezing cold in our house at night, so in the morning, C has been wearing his old robe that I made him 2 years ago. Needless it say, the arms and bottom was about 3 inches too short.

Now, C and L have cozy robes to wear and they actually fit.


C wanted a button at the top so none of his skin hit the air and he didn't want to wear a shirt under it because then he wouldn't be able to feel the softness.


Back inside to play legos together.


Now we are all so warm and cozy in our robes!

Thursday, January 5, 2012

Lunch Sac from Scraps

At the beginning of the year, I made C a little lunch sac. As you can see, it wasn't so cute. Since then, I have had a new one on my to-do list. Originally C wanted a camo sac, but they were all out of camo at the store. Then I remembered I this.


I managed to get some squares out of it.


This is what I came up with for C's new lunch sac. It has velcro on the inside and little handles that are much better then the first lunch sac.


I didn't have quite enough squares, can you tell?


At least the black strip matches. Maybe I should use a lint brush on it before I take a picture next time.


Kristen

Tuesday, January 3, 2012

Refashion T-Shirt

Mr. C had this shirt that wasn't so old, it just didn't fit him so well. I decided to cut it up and make a smaller one for little C.


The color is a little off because of the lighting and my camera settings. I'm learning.

Anyway, I just cut the front out of the front and the sleeves out of the sleeves.


I sewed the sleeves on before I sewed the sides. I wanted to try the other way of doing sleeves. I think this way is great for t-shirts. Putting the sleeves on last I think works better for more fitted shirts.


But sleeves usually aren't a problem for me, it's the necks of t-shirts that give me the most trouble!


Can you tell? It's a little stretched out. I did have to rip out the neck and re-do it, that never seems to make it any better.


The shirt is a tad big because I used a new shirt of C's to trace that is a bit big. I wanted it to fit for a long time. I don't want to do all that work to have him grow out of it in a month. But other then that and the neck, the shirt is perfect. I guess that's not quite perfect.

Kristen

Friday, December 2, 2011

Tooth Fairy Pillow

Wow, we are loosing so many teeth around here. I have been meaning to make C a tooth fairy pillow for a while now and then he lost his 4th tooth Tuesday night. 2 more are about to fall out. So, when he went to bed that night I made a quick little pillow.


C got to wake up with a dollar stuffed into his new little tooth fairy pillow. He was very excited.


Can you tell he just rolled out of bed?

Here it is again next to all the rag rug stuff that I'm working on for a tutorial.


I'm so glad he loves it!

Kristen