Sunday, April 10, 2011

Car Organization

Here is a project I have had in mind for probably about a year. I finally got so annoyed with stuff all over my car that I set out to actually do the project this weekend. With L being sick sleeping most of the weekend and C with is grandparents, I had plenty of time. 


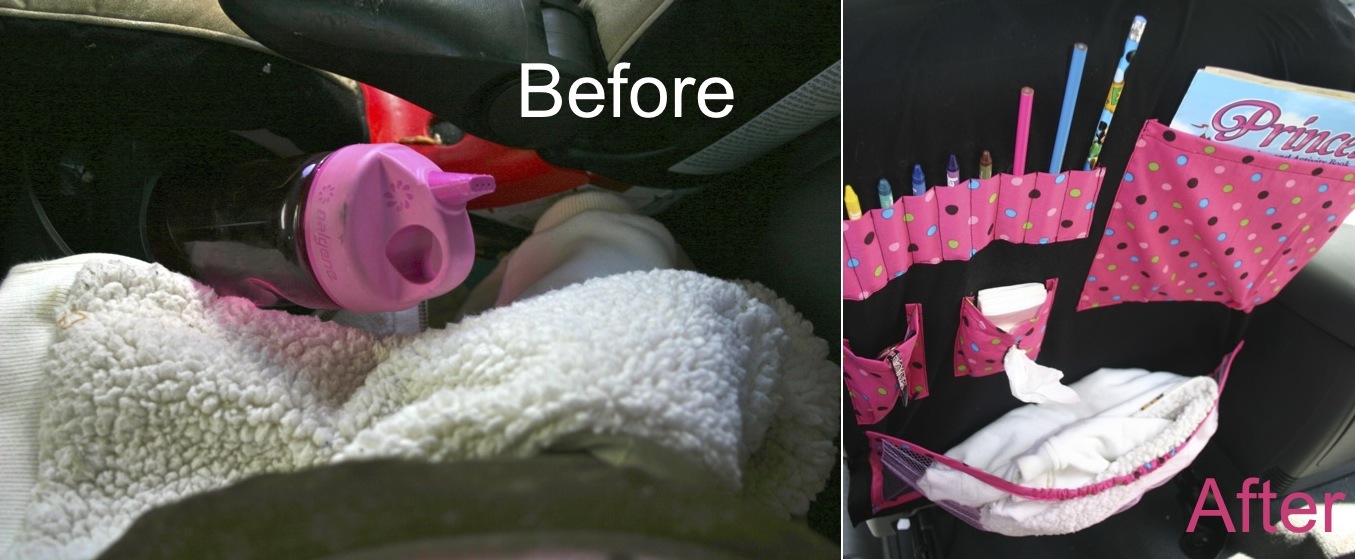
I use to have these ugly faded seat back covers. I always thought they needed pockets in them, but they were also a bit too small and the ties at the top were a bit too far apart. See how it pulls and makes it bunch up? So, I decided to make custom seat back covers.


L went shopping with me Friday just before she got really sick and picked out her fabric. She was totally set on this pink with polk-a-dots. It actually was great because it went well with the black for the cover. I picked C's fabric, blue and black are his favorite colors. But, I really don't think it matters because he is just so excited to have pockets. He LOVES pockets.

Look at that mess on the floor! Then, look how nicely everything has it's place.


Again, another mess in-between seats where the jackets are kept... Until now, there is a nice pocket just perfect for that jacket.


Here is a picture of both seat back covers. C's bottom pocket is a bit heavy, so I may add some boning to the back behind the bottom pocket.


Yes, L has tissue and C has an extra pocket for toys because L is constantly asking me for a tissue. She can't stand having anything in her nose and blows it probably about once every car ride.


Look what I made with just some of the scraps of fabric...


Isn't it lovely boy bias tape? Plus, I still have a ton of fabric left over.
I am linking with:

Keeping It Simple

This project was featured on:


Organize and Decorate Everything

Thursday, April 7, 2011

Quilts

First, let me tell you the reason for this post. Before I had my own blog, my friend showed me this little crafting blog, Sew Much Ado. Ha, ha! Not so little, anyway, she said I should try something she saw on it. I had never read blogs before and I was instantly hooked. I didn't know what following was, but I would check her blog every day and started looking forward to her "Flashback Friday." I liked Flashback Friday so much because for one, now that I'm older I really appreciate history and secondly, I never really knew much of my own family history. So, when Abby stopped doing her Flashback Friday I had to contact her and tell her I missed it. I did and told her about my quilts. She mentioned it would be great for Flashback Friday. Well... I became inspired.

First, I want to show you this little priceless (to me) item I have that was my grandma's. My dad had it for years after my grandma died, but it was my oldest sisters. When my dad died, she said I can have it because I sew and she doesn't. She may take it back some day, but in the mean time I am enjoying it.


Ok, now on to the quilts... If you've been following my blog, you know by now I am not a quilter. I absolutely LOVE them, but as I have mentioned a time or two, I don't like sewing squares, things that become a square or anything to tedious or complicated. I'm just too impatient. It's funny though, I have always admired quilts and looked at many of them with awe.

When I was a kid for as long as I can remember there were hand made blankets all around either sewn by my mom, my grandma on my dad's side or crocheted by her. My grandma was deaf, so we never talked much, but I very much admired her. I remember every Christmas getting a matching crocheted blanket and slippers. I loved getting those and wearing them all the time. Maybe that's where my secret obsession of cozy blankets comes from, those wonderful hand made blankets from my grandma.

Then when I was a bit older I remember going over to my aunt's house (dad's sister) and she had these old quilts on all her beds. I could just sit and stare at them being amazed and wondering how they were put together and how long it must have took. I never remember expressing what I thought, but when my grandma died, I got one of her quilts. It is such an interesting quilt made from scraps. That was what caught my eye right away. I recognized a brown and white checkered pattern from a baby blanket I had. It was so cool. My grandma just took scraps from all the things she made in the past and made this very unique quilt. She was green and crafty. This quilt became my bed spread for a couple years. I think it was made in the 70's.


It's very cool, each bunch of scraps were made into a square, then sewn together as a quilt. I never really thought about "being green" back then. But, that is one of the reasons I loved this quilt so much, something cool to do with the scraps.

You can see how much it is falling apart. I don't really know the best way to fix it. I don't want to add a new back, but I'm afraid just sewing the ripped parts will make it worse.


Fast forward a few years after my grandma died, I was at my aunt's house and she brought this quilt and a bible out to me and said I could have it. She said it was made by my grandma and she thought I should have it along her bible that she wrote in. Oh my goodness! I was SO excited. Both were such an amazing gift. I have now learned from my wonderful readers that this is a Cathedral Window Quilt.


This quilt was hand sewn. Can you imagine? The entire thing hand sewn. I have no idea how old it is or why it was sewn by hand.


I absolutely love the fabrics, I wish my aunt could find an old stash of fabrics from this quilt. Some of my favorites are the green above, the blue and white below,


the paisley below,


and this flower print.


I was never able to talk to my grandma because I never learned sign language, but I always knew she was an amazing woman. She was an extremely hard worker, a strong Christian, and a poor, but giving woman. She loved quilting and crocheting, I love sewing and knitting. I guess I do have some history in my blood that gave me the love of handmade.

My grandma used to sit in-front of the TV that would be blaring, she would have no idea because she couldn't hear and she would just crochet away. She wouldn't even have to look at her work, she would count by feeling. Maybe that's how she made this quilt also, in-front of the blaring TV she couldn't hear. It must have been her way to relax, using her hands to make something so beautiful. Funny, she used her hands all day long to talk also.

I am honored to be over at Sew Much Ado for this post.


Wednesday, April 6, 2011

Yellow

My bestfriend's little girl LOVES yellow. So, I thought it would be cool to give her a hand made, yellow present for her birthday. I wasn't blogging at the time, this was when I would take pictures on my phone and e-mail them to her. Therefore, all I have are camera phone pictures.


I went to the thrift stores to see what I could find in yellow and found this shirt. I thought it would be perfect to make one of those shirt-tutu things. That is my attempt at it. Not bad for dress-up. The purse on the other hand is pretty cool. I wish I had more pictures of that. It really turned out cute.


This picture is so tiny because the quality is so bad, but I wanted to give you an idea of what it looked like. I lined it with some bright yellow flannel I happened to have on hand.

It was so much fun making this hand made gift and because it was all yellow, the little girl loved it. Now, if I see cheap, cute, yellow fabric I buy it for her next birthday.

Monday, April 4, 2011

Handmade gift

Ok, so I was totally inspired by Ladybug Blessings to do a completely handmade gift. I had a ton of fun doing it and there was no waist. That was all cool, but the best part was, on the way to the party, C said, "Mommy, this is the best present we've ever given somebody."

So, here is what I did...


There is some fake makeup inspired by Playing House. No toxic chemicals on any kids face with this and it was super easy to make. My 5 year old did one of them.

The little unicorn thing is what I call "Art on the go." I have seen many different versions of these things, but this is my version. It has vinyl in it for a chalk board, chalk, crayons, a pencil and paper.


Then I made a little dance skirt. My little model wasn't into modeling today.


Last was this little Hobo Sac. Yes, it was made from the tutorial by Made.


I used the Hobo Sac as the gift bag to hold the present.

I don't have a picture of it, but the only part that was not Homemade was the card that actually wasn't a card at all. I always buy a book and use that as the card. I just tape a little index card to it with the happy birthday message to it. That way, a card isn't just tossed out in the trash to fill up the land fills.

Well, I hope you are inspired as I was to give homemade. It's quite a lot of fun.

I am linking with:

Sunday, April 3, 2011

Dance Skirt Tutorial

I love making L skirts because they are the easiest thing in the world. So, I decided to use the kind I make and do a tutorial. Only thing is, I changed it up a bit for the dance skirt and it made it a little more difficult. Not to worry though, still totally easy.


You will need:
1. Measuring tape
2. Old Newspaper
3. Pen and marker
4. Tiny elastic
5. Fabric with coordinating thread
6. Scissors

First, make your pattern, measure the waist of the person the skirt is for and the length you want the skirt. For the dance skirt, add about 3 inches and divide that total number in half. So, if your daughter's waist is 23 inches add 3, that's 26. Divide that in half and you get 13. That will be the width of your pattern. The length is just what you want the length of your skirt adding an allowance of 1/2 an inch. Draw it, cut it out and you will have a rectangle.


Now, draw vertical lines on the paper evenly spaced. I did 4, this number is not exact. Now, cut along those lines almost to the top. Making sure not to cut all the way through the paper. This is to spread out the rectangle evenly to make the skirt twirly and flowy.

Now transfer to the fabric, 1. Fold your fabric, put one edge of the paper on the fold and spread out the slashes. After that, take your permeant marker and draw where I would cut.


Now cut.


Sew the side seam together, right sides together.


Now, you will make the bottom part. I think this might be a lettuce hem. Anyway, set your machine to a zig zag, please don't notice all the dust on my machine.


Also, a very tight stitch. 


Fold the fabric under just a bit and zig zag right on that folded edge.


I went around two times on mine because I like the way it looked better after the second time.


Almost done. On the top you are going to make a casing. Fold the top under about 1/4 an inch and zig zag all the way around leaving an opening that you can slide the elastic in. Hook a safety pin to one end of the elastic and feed it through the casing. When you get to the edge sew the two ends together and close your opening. Tiny elastic is very difficult to work with in the sewing machine, but I like it for the dance skirt.


There is your dance skirt. The model wasn't too into modeling today.


The skirt made a cute little gift that went inside that little sack behind it.


Happy sewing!

I'm linking with:

Keeping It SimpleThe Girl CreativeBWS tips buttonSumo Sweet Stuff

Friday, April 1, 2011

Bringing Home the Chickens

We got them! Our chickens. I have waited so long for this. We are so excited. They should start laying eggs in a few months. Hopefully they are all hens, no roosters.

Here we are getting ready for the little hens... Hopefully, hens.


Here are their baskets.


Little C and Mr. C are filling the water.


L is watching, waiting for the chickens to come out.


Here they come!


C is eager to hold one.


He is so gentle with them.


L thought she was ready, but changed her mind.


Aren't they cute? We wanted all different. they two on the left are sisters and the two on the right are sisters a little bit younger.


Ah-Oh, one got stuck. We need to get a string for that latch. I don't want to be locked in with the kids when we are the only ones home.


Now can we call our home a farm?