At the beginning of the year, I made C a little lunch sac. As you can see, it wasn't so cute. Since then, I have had a new one on my to-do list. Originally C wanted a camo sac, but they were all out of camo at the store. Then I remembered I this.
I managed to get some squares out of it.
This is what I came up with for C's new lunch sac. It has velcro on the inside and little handles that are much better then the first lunch sac.
I didn't have quite enough squares, can you tell?
At least the black strip matches. Maybe I should use a lint brush on it before I take a picture next time.
Kristen
Thursday, January 5, 2012
Tuesday, January 3, 2012
Refashion T-Shirt
Mr. C had this shirt that wasn't so old, it just didn't fit him so well. I decided to cut it up and make a smaller one for little C.
The color is a little off because of the lighting and my camera settings. I'm learning.
Anyway, I just cut the front out of the front and the sleeves out of the sleeves.
I sewed the sleeves on before I sewed the sides. I wanted to try the other way of doing sleeves. I think this way is great for t-shirts. Putting the sleeves on last I think works better for more fitted shirts.
But sleeves usually aren't a problem for me, it's the necks of t-shirts that give me the most trouble!
Can you tell? It's a little stretched out. I did have to rip out the neck and re-do it, that never seems to make it any better.
The shirt is a tad big because I used a new shirt of C's to trace that is a bit big. I wanted it to fit for a long time. I don't want to do all that work to have him grow out of it in a month. But other then that and the neck, the shirt is perfect. I guess that's not quite perfect.
Kristen
The color is a little off because of the lighting and my camera settings. I'm learning.
Anyway, I just cut the front out of the front and the sleeves out of the sleeves.
I sewed the sleeves on before I sewed the sides. I wanted to try the other way of doing sleeves. I think this way is great for t-shirts. Putting the sleeves on last I think works better for more fitted shirts.
But sleeves usually aren't a problem for me, it's the necks of t-shirts that give me the most trouble!
Can you tell? It's a little stretched out. I did have to rip out the neck and re-do it, that never seems to make it any better.
The shirt is a tad big because I used a new shirt of C's to trace that is a bit big. I wanted it to fit for a long time. I don't want to do all that work to have him grow out of it in a month. But other then that and the neck, the shirt is perfect. I guess that's not quite perfect.
Kristen
Sunday, January 1, 2012
Recipe - No Bake Energy Balls
Now that I am feeling a little less overwhelmed, I am back to blogging and surfing blogs again. Today I found this wonderful recipe for energy balls at Smashed Peas and Carrots.
Too bad, my picture isn't quite as good as hers. Even so, it looked like something my family would love so I had to try it. The only thing is, I can never follow a recipe exact, I'm always changing things up a bit. So, here is my version.
1 c oatmeal
1/3 c honey
1/4 cup semi sweet soy free chocolate chips or 1 packet Nestle chocolate milk powder (this change was because it was the only choc. I had in the house.)
My ingredients:
I buy oatmeal in bulk because it is cheaper and we go through a ton in our house between these energy balls and breakfast. Since my son can't have wheat, corn, peanuts or soy, I can't do normal sandwiches for lunch. These energy balls are a great protein to replace peanut butter and jelly sandwiches or processed lunch meat.
My coconut comes from the bulk bins at Sprouts.
Our chocolate chips must be soy free again because of my son.
I usually buy the nut butters at Trader Joe's because they have a smoother texture and stronger flavor.
I always get local honey at our weekly farmers market. It helps with allergies.
Mix it all together.
Too bad, my picture isn't quite as good as hers. Even so, it looked like something my family would love so I had to try it. The only thing is, I can never follow a recipe exact, I'm always changing things up a bit. So, here is my version.
1 c oatmeal
1 c unsweetened coconut
3/4 c flax seed
1/2 c all natural peanut butter or any other nut butter (for those that can't have peanut butter like my son)1/3 c honey
1/4 cup semi sweet soy free chocolate chips or 1 packet Nestle chocolate milk powder (this change was because it was the only choc. I had in the house.)
My ingredients:
I buy oatmeal in bulk because it is cheaper and we go through a ton in our house between these energy balls and breakfast. Since my son can't have wheat, corn, peanuts or soy, I can't do normal sandwiches for lunch. These energy balls are a great protein to replace peanut butter and jelly sandwiches or processed lunch meat.
My coconut comes from the bulk bins at Sprouts.
Our chocolate chips must be soy free again because of my son.
I usually buy the nut butters at Trader Joe's because they have a smoother texture and stronger flavor.
I always get local honey at our weekly farmers market. It helps with allergies.
Mix it all together.
Form it into little balls, it helps to wet your hands every few balls to prevent it from sticking to your hands. Then refrigerate. I store mine in the fridge because I used the peanut butter you have to stir. They were delicious! My kids loved them. I loved them. Mr. C loved them.
Kristen
Thursday, December 29, 2011
Knitted Christmas Dress
Last year I made this dress...
I loved how quick and easy it was to make. I also loved the randomness of the colors. It was a yarn that a friend bought for me and I new instantly it had to be in a dress. Well, this year for Christmas I thought I'd make L a new knitted dress. This time it wasn't so easy, I realized I was doing something wrong when I was almost finished. So, I had to rip the whole thing out 2 days before she had to wear it. I ended up working on it until the moment we left the house. But, at least I finished and got a picture in with her wearing it.
The dress ended up being a little big, but it worked. Maybe I will add a little flower to it and she can wear it again for Christmas next year. It was only a couple bucks. 1 skein of Red Heart yarn.
I loved how quick and easy it was to make. I also loved the randomness of the colors. It was a yarn that a friend bought for me and I new instantly it had to be in a dress. Well, this year for Christmas I thought I'd make L a new knitted dress. This time it wasn't so easy, I realized I was doing something wrong when I was almost finished. So, I had to rip the whole thing out 2 days before she had to wear it. I ended up working on it until the moment we left the house. But, at least I finished and got a picture in with her wearing it.
The dress ended up being a little big, but it worked. Maybe I will add a little flower to it and she can wear it again for Christmas next year. It was only a couple bucks. 1 skein of Red Heart yarn.
Tuesday, December 27, 2011
DIY Farmhouse Table
I LOVE the Pottery Barn style tables.
Actually, I love the Pottery Barn style everything. But, I especially love the tables. They are just so darn expensive and I really can't spend that kind of money on a table with 2 small children. I want to actually be able to use the table. Anyway, I knew a table wouldn't be that hard to make so I was trying to get my father-in-law to make me one, when my husband offered! I couldn't believe it, I've asked him so many times to make me furniture and he never wants to. Now he is so into it.
He showed me this table he was going to make. I loved it, so he got right to work.
We picked Douglas Fur for the wood because I really liked the grain in it and thought it would look really nice stained. I wanted the table to be very basic.
Here is how the stain turned out. C really loves helping daddy!
The table looks really nice all stained, but it's not quite finished, Mr. C wanted to put those metal straps in it to give it a little extra character. I thought it looked fine the way it was.
Mr. C was right, I love it the way he did it.
Final cost was a little over $100.
Now, he is working on my bench, hopefully it will be done by this weekend. I don't have any chairs either. I'm looking for mismatched, matching chairs from thrift stores.
Actually, I love the Pottery Barn style everything. But, I especially love the tables. They are just so darn expensive and I really can't spend that kind of money on a table with 2 small children. I want to actually be able to use the table. Anyway, I knew a table wouldn't be that hard to make so I was trying to get my father-in-law to make me one, when my husband offered! I couldn't believe it, I've asked him so many times to make me furniture and he never wants to. Now he is so into it.
He showed me this table he was going to make. I loved it, so he got right to work.
We picked Douglas Fur for the wood because I really liked the grain in it and thought it would look really nice stained. I wanted the table to be very basic.
Here is how the stain turned out. C really loves helping daddy!
The table looks really nice all stained, but it's not quite finished, Mr. C wanted to put those metal straps in it to give it a little extra character. I thought it looked fine the way it was.
Mr. C was right, I love it the way he did it.
Final cost was a little over $100.
Now, he is working on my bench, hopefully it will be done by this weekend. I don't have any chairs either. I'm looking for mismatched, matching chairs from thrift stores.
Friday, December 16, 2011
Gingerbread Houses
We love doing gingerbread houses around here. I love the candy and frosting the most. The only thing is those darn store bought ones are not very good and you have to put them together in a specific way. This year we decided to do graham cracker houses instead. Now everybody gets their own to build.
Getting Ready...
L and Daddy got to work together.
Daddy didn't mind doing the hard part of shaping the roof.
This is serious work in our house.
Some ends up on the face instead of the house, but that's ok if its the good stuff.
Here are our 3 houses, Mommy's, C's and L and Daddy's. What is your vote?
Of course we have to display them till Christmas. L already snuck and ate some of her's a couple days after they were displayed, so now many the little gum drop lights at the bottom are missing.
Getting Ready...
L and Daddy got to work together.
Daddy didn't mind doing the hard part of shaping the roof.
This is serious work in our house.
Some ends up on the face instead of the house, but that's ok if its the good stuff.
Here are our 3 houses, Mommy's, C's and L and Daddy's. What is your vote?
Of course we have to display them till Christmas. L already snuck and ate some of her's a couple days after they were displayed, so now many the little gum drop lights at the bottom are missing.
Wednesday, December 14, 2011
Our Favorite House at Christmas
This is our favorite house to visit every Christmas!
You can see the tree streets away.
The Nativity is right out in front beautifully lit up.
The kids favorite part is the snow that you can turn on and dance in the street under it.
Monday, December 12, 2011
Rag Rug Tutorial
Since I had so many questions on the last rag rug, I decided to do a tutorial. Also, my sister has wanted one really bad, so this is her Christmas present.
You will need:
Fabric - Lots of fabric in colors you would like to see together. You can buy new or use old scraps.
Scissors
sewing machine or thread and needle
First, I cut my fabric in strips about 1/5-2 inches.
Then I take strips and start braiding. It's helpful to have 2 long strips and 1 short strip. The short strip you can pull through so the bottom doesn't braid on itself.
When you run out of fabric, sew another piece on.
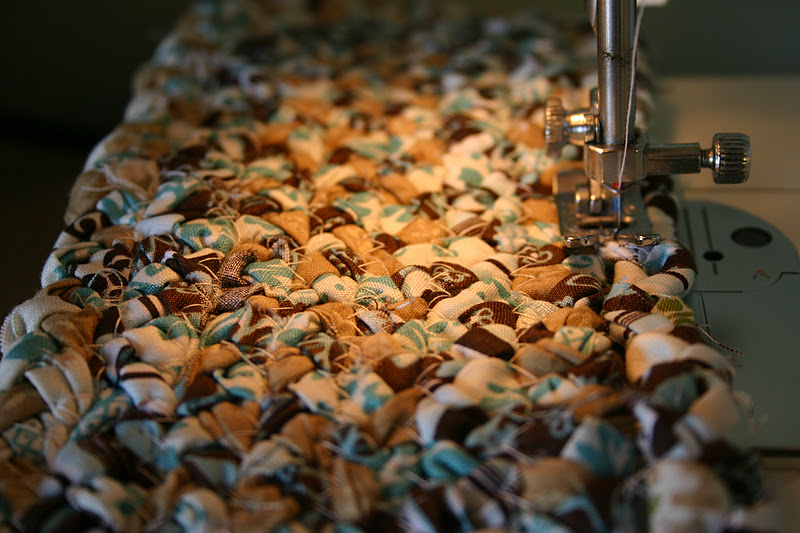
When you think your braid is long enough, start sewing it together. Don't finish off the braid yet, just incase it's not long enough. I thought mine was long enough, but it wasn't so I just added on.
I first take the beginning and fold it on itself about 10-12 inches. Here is where you can hand sew, but I just stick it in my machine and zig zag. You have to be careful not to pull the braid tight or it will start to turn into a bowl. But, you also can't bunch the braid together too much or it will get ruffly. You just have to find that balance of even braid.
The zig zag stitches show, but they don't stand out when the rug is on the ground.
See, just bump the braid up next to itself as you sew.
Have fun putting your scraps to good use and not waisting!
You will need:
Fabric - Lots of fabric in colors you would like to see together. You can buy new or use old scraps.
Scissors
sewing machine or thread and needle
First, I cut my fabric in strips about 1/5-2 inches.
Then I take strips and start braiding. It's helpful to have 2 long strips and 1 short strip. The short strip you can pull through so the bottom doesn't braid on itself.
When you think your braid is long enough, start sewing it together. Don't finish off the braid yet, just incase it's not long enough. I thought mine was long enough, but it wasn't so I just added on.
I first take the beginning and fold it on itself about 10-12 inches. Here is where you can hand sew, but I just stick it in my machine and zig zag. You have to be careful not to pull the braid tight or it will start to turn into a bowl. But, you also can't bunch the braid together too much or it will get ruffly. You just have to find that balance of even braid.
The zig zag stitches show, but they don't stand out when the rug is on the ground.
See, just bump the braid up next to itself as you sew.
Have fun putting your scraps to good use and not waisting!
Friday, December 2, 2011
Tooth Fairy Pillow
Wow, we are loosing so many teeth around here. I have been meaning to make C a tooth fairy pillow for a while now and then he lost his 4th tooth Tuesday night. 2 more are about to fall out. So, when he went to bed that night I made a quick little pillow.
C got to wake up with a dollar stuffed into his new little tooth fairy pillow. He was very excited.
Can you tell he just rolled out of bed?
Here it is again next to all the rag rug stuff that I'm working on for a tutorial.
I'm so glad he loves it!
Kristen
C got to wake up with a dollar stuffed into his new little tooth fairy pillow. He was very excited.
Can you tell he just rolled out of bed?
Here it is again next to all the rag rug stuff that I'm working on for a tutorial.
I'm so glad he loves it!
Kristen
Subscribe to:
Posts (Atom)