We have been "Going Green" since before that phrase was... well a phrase. I think it started way back when we were dating and would go backpacking almost 15 years ago. Being that close to nature, especially nature that is very limited in it's visitors makes you see how important it is to preserve it. It is so magnificent! Really, there just aren't words to describe what the Earth has to offer. Anyway, once we started consciously caring it was one thing leading to another. So, for you I have compiled this list of things you can do to Cheaply Go Green...
1. Throw Trash in it's proper place.
2. Change the way you grocery shop - Don't buy packaged foods. You will have less waist, it's healthier and cheaper.
3. Take the trash out only every other week. Every 3 or 4 weeks if you can. But this will help you to be conscious of what you are throwing away.
4. Don't use paper towels.
5. Change your light bulbs. - LED are the best, but still pretty expensive. If you can't afford that, do those spiral ones, I think they are called incandescent.
6. Unplug - What ever you are not using that does not need to be on. Kitchen appliances are great. You can even put them away if you are not using them, who needs toast anyway. It's not really all that healthy.
7. Buy non-battery operated toys. For birthdays when people ask what your kids want, tell them nothing that requires batteries, please.
8. Plant a garden. It's easier then you think. You can start with just one item a season, perfect it and add on. Or go bold and start with every veggie you like to eat.
9. Raise chickens for eggs - they are healthier, cute pets and you will make less of a carbon foot print.
10. Use your blinds - Close them when it's cold out and the sun is down. Open them for the sun to heat up the house on a cool day and close them when it is hot outside.
11. Compost - especially if you have a garden! Don't ever use peat moss, it is not sustainable. Peat lowers CO2 in the environment but when it is taken from the wetland for your garden it creates a loss of this wet land.
12. Walk or bike when you can.
13. Limit your TV hours - give up one show a month. You will see how much more productive you are after a few months and save money on your electric bill.
14. Thrift Shop - it's fun and saves resources. You can refashion clothes you find or refinish old furniture or you might just get an amazing deal on something you really like. I got my favorite hoodie for $2.
15. Use snack packs and reusable lunch bags. (Tutorial coming soon!)
So there you have it, 15 ways to be cheap and green. Who says it's too expensive to be healthy or green?! By the way, going green is GREAT for your healthy also.
Monday, March 21, 2011


Sunday, March 20, 2011
Short Sleeves
Well, I told you I would give a tutorial on sleeves. I decided to make L a shirt from the purple I made mine from. You can see the neck is too wide. I made the shoulders a little too narrow. Now you can see what a mistake does.

It is such a pretty fabric, but very thin. That combined with L's clothes being tiny made it a little more difficult. But I will go ahead and show you what I did for the sleeves. Long sleeves are easier to explain, so, I will do a tutorial on that next. I have a long sleeve shirt I have been wanting to make anyway.
Here we go... This is what you need.

To trace the shirt part see this tutorial. I did the same thing here, I traced the front and back of the shirt. Don't forget the allowance for the hem.

When I got to the sleeve, I tucked it in the shirt and traced the curve as best I could.

I did that for the front and back. Don't forget the shoulder and neck line. The back shoulder edge was thick enough, but the front was too skinny. I took a short cut and widen the neck of the back of the shirt to fit the shoulder of the front. Not a could choice. Short cuts are NOT good in sewing.
When tracing the neck line, trace under the neck edge at the seam because you will be adding that edge at the end. I hope that makes sense, if not, leave a comment and ask a question.

Ok, now the sleeves. Measure the curve of the front and back. They should be about the same. You will need this number to help with your sleeve curve.


Now, take the sleeve and lay it with the folded part on the fold of the paper.

Trace the edge, don't forget hem allowance. Trace the inside of the arm to the armpit. Make a mark at the top of the shoulder where the sleeve meets the shirt. That will be the top of your bell curve.

Next move the shirt off the paper and draw this shape (half a bell) from the top to the bottom of the armpit.

Measure it. If it is too big (I needed 5.25 inches) then flatten out your curve. If it is too small make it more curvy. Mine was too big. I could kind of tell before I measured because it was very curvy.

The first time wasn't enough so I had to flatten it more. Now it's good, I cut it out.

Time to trace the pattern onto the fabric. Remember if you are using knit, put the fabric on something it can slip on so the fabric doesn't stretch. I use my kitchen table. Here are my pieces. Pin right sides together. Sew the sides and shoulders.
For the sleeves, fold them in half, right side together. Sew the bottom of the bell, that becomes the inside (underarm) of the sleeve.

Save any little scraps you may use them later. I used this for the neck edge.

Once you have those pieces sewn together, take the sleeve, flip it right side out. Slip it inside the armhole matching the underarm seam with the side seam of the shirt. Also, match the center top of the bell with the shoulder seam. Pin all the way around and sew.

L's sleeve hole was so tiny that I just had to hold the other side of the sleeve out of the way of the needle under the fabric.

Now sew your bottom and sleeve hems. Make sure to do a zig zag on the hems and don't pull stretching the fabric as you sew.
Last we have to do the neck. You know how t-shirts always have that edge around the neck? Well, I used that little strip I showed you earlier, folded it and cut 1/2 an inch 20 inches long. (A little more then enough for the neck. I kept it folded, pinned the open part to the right side of the shirt at the neck and sewed all the way around.

After I sewed it, I top stitched it so the seam was up on the inside.

You can see how the shoulders aren't wide enough and the neck line goes a little to far out.

That's ok, L loves it and the sleeves look good.

She even had to wear it to church tonight and told me to wear my purple shirt too. Then she made sure she was wearing black shoes with her jeans because I was.
Happy Sewing!
I'm linking with:


It is such a pretty fabric, but very thin. That combined with L's clothes being tiny made it a little more difficult. But I will go ahead and show you what I did for the sleeves. Long sleeves are easier to explain, so, I will do a tutorial on that next. I have a long sleeve shirt I have been wanting to make anyway.
Here we go... This is what you need.

To trace the shirt part see this tutorial. I did the same thing here, I traced the front and back of the shirt. Don't forget the allowance for the hem.

When I got to the sleeve, I tucked it in the shirt and traced the curve as best I could.

I did that for the front and back. Don't forget the shoulder and neck line. The back shoulder edge was thick enough, but the front was too skinny. I took a short cut and widen the neck of the back of the shirt to fit the shoulder of the front. Not a could choice. Short cuts are NOT good in sewing.
When tracing the neck line, trace under the neck edge at the seam because you will be adding that edge at the end. I hope that makes sense, if not, leave a comment and ask a question.

Ok, now the sleeves. Measure the curve of the front and back. They should be about the same. You will need this number to help with your sleeve curve.


Now, take the sleeve and lay it with the folded part on the fold of the paper.

Trace the edge, don't forget hem allowance. Trace the inside of the arm to the armpit. Make a mark at the top of the shoulder where the sleeve meets the shirt. That will be the top of your bell curve.

Next move the shirt off the paper and draw this shape (half a bell) from the top to the bottom of the armpit.

Measure it. If it is too big (I needed 5.25 inches) then flatten out your curve. If it is too small make it more curvy. Mine was too big. I could kind of tell before I measured because it was very curvy.

The first time wasn't enough so I had to flatten it more. Now it's good, I cut it out.

Time to trace the pattern onto the fabric. Remember if you are using knit, put the fabric on something it can slip on so the fabric doesn't stretch. I use my kitchen table. Here are my pieces. Pin right sides together. Sew the sides and shoulders.
For the sleeves, fold them in half, right side together. Sew the bottom of the bell, that becomes the inside (underarm) of the sleeve.

Save any little scraps you may use them later. I used this for the neck edge.

Once you have those pieces sewn together, take the sleeve, flip it right side out. Slip it inside the armhole matching the underarm seam with the side seam of the shirt. Also, match the center top of the bell with the shoulder seam. Pin all the way around and sew.

L's sleeve hole was so tiny that I just had to hold the other side of the sleeve out of the way of the needle under the fabric.

Now sew your bottom and sleeve hems. Make sure to do a zig zag on the hems and don't pull stretching the fabric as you sew.
Last we have to do the neck. You know how t-shirts always have that edge around the neck? Well, I used that little strip I showed you earlier, folded it and cut 1/2 an inch 20 inches long. (A little more then enough for the neck. I kept it folded, pinned the open part to the right side of the shirt at the neck and sewed all the way around.

After I sewed it, I top stitched it so the seam was up on the inside.

You can see how the shoulders aren't wide enough and the neck line goes a little to far out.

That's ok, L loves it and the sleeves look good.

She even had to wear it to church tonight and told me to wear my purple shirt too. Then she made sure she was wearing black shoes with her jeans because I was.
Happy Sewing!
I'm linking with:
Saturday, March 19, 2011
Carrots
We are at a weird point in our garden. We had some hot spells that ruined the broccoli and lettuce and it was too soon to start planting spring stuff. But, our carrots have been growing quite nicely for a while. I had a little trouble with the carrots to begin with this year, but they finally took off.
Here is some of what I dug up today.

Before I brought them in, I had to wash the mud off, then I scrubbed them in the sink.

We planted such a variety, round ones, purple and white ones, long, skinny ones and short, fat ones.

Problem is, I don't know where in the garden each kind are until I dig them up. We tried to plant a nice little row. We kept them watered and even put a plastic tunnel over them because they weren't sprouting. After about a month we gave up and took the cover off. Soon later, we had about a week of rain. After the rain I noticed carrots popping up everywhere. Not just in the row, but on the side of it. Mr. C was convinced it was weeds. I had to sacrifice one by pulling it and having him smell the tiny root to get him to believe me they were indeed carrots. We did have some wind before the rain, so that's how the seeds got scattered. But, I realized the rain is what I needed for the carrots to finally sprout. So every time it would rain I would sprinkle carrot seeds out. The wind sometimes would scatter them, but I sure have a lot of carrots, about 4 full seed packages. It's funny how people think I am so good at gardening. Ha! I just went out the morning it started raining and sprinkled seeds. That's it.
I would take a picture of our beautiful row, but unfortunately I did the same thing with the alfalfa sprouts. They are now growing wild, so you can't see the carrots till you dig through the sprouts. The sprouts are excellent for the soil though.
I have never had or seen a purple carrot before. When I cut into it and was surprised to see that it is deep orange inside.

Here is our bowl full of carrots soaking in water to keep them crisp. You can kind of see the fat round one on the bottom right of the picture.

Happy harvesting!
I'm linking with:
Here is some of what I dug up today.

Before I brought them in, I had to wash the mud off, then I scrubbed them in the sink.

We planted such a variety, round ones, purple and white ones, long, skinny ones and short, fat ones.

Problem is, I don't know where in the garden each kind are until I dig them up. We tried to plant a nice little row. We kept them watered and even put a plastic tunnel over them because they weren't sprouting. After about a month we gave up and took the cover off. Soon later, we had about a week of rain. After the rain I noticed carrots popping up everywhere. Not just in the row, but on the side of it. Mr. C was convinced it was weeds. I had to sacrifice one by pulling it and having him smell the tiny root to get him to believe me they were indeed carrots. We did have some wind before the rain, so that's how the seeds got scattered. But, I realized the rain is what I needed for the carrots to finally sprout. So every time it would rain I would sprinkle carrot seeds out. The wind sometimes would scatter them, but I sure have a lot of carrots, about 4 full seed packages. It's funny how people think I am so good at gardening. Ha! I just went out the morning it started raining and sprinkled seeds. That's it.
I would take a picture of our beautiful row, but unfortunately I did the same thing with the alfalfa sprouts. They are now growing wild, so you can't see the carrots till you dig through the sprouts. The sprouts are excellent for the soil though.
I have never had or seen a purple carrot before. When I cut into it and was surprised to see that it is deep orange inside.

Here is our bowl full of carrots soaking in water to keep them crisp. You can kind of see the fat round one on the bottom right of the picture.

Happy harvesting!
I'm linking with:
Friday, March 18, 2011
Bell Peppers!
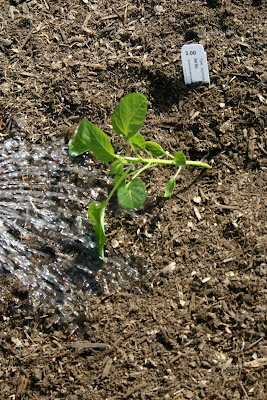
Finally! We get to plant our spring garden, although, spring doesn't officially start till March 20th. The "Monster Pepper and Tomato sale was going on at Cal State's Arboretum. Peppers (crunchies) are a favorite around here so C was very excited to pick out what he wanted. Anyway, remember that planter box we made? Well, now we get to fill it.

C did most of the digging, I just put the plants in.

Digging the hole...

Checking the fit...

Perfect!

Time to water...

Oops, I deleted the good picture.
We have tangerine pimentos, heart shaped pimentos, small red and yellow chrunchies (very sweet) king red, big orange and yellow and a couple disease resistant hybrid varieties. 13 in all.

I hope this inspires you to garden and eat lots of veggies.

C did most of the digging, I just put the plants in.

Digging the hole...

Checking the fit...

Perfect!

Time to water...

Oops, I deleted the good picture.

We have tangerine pimentos, heart shaped pimentos, small red and yellow chrunchies (very sweet) king red, big orange and yellow and a couple disease resistant hybrid varieties. 13 in all.

I hope this inspires you to garden and eat lots of veggies.
Wednesday, March 16, 2011
Baby Washcloths
Remember my lovely friend that gave me the lovely sewing desk? Well, she had her baby 2 weeks early! Yes, I say this with an ! because I didn't have her little welcome baby gift ready. I thought I for sure had 12 days since her previous two were a day and 2 days early. Well, now instead of showing you all how to make sleeves, I had to use my sewing time I barley got this week to finish her welcome baby gift.

I got this idea from another blog that I can't seem to find now. I looked it up on the internet to try to give credit and found tons of blogs with the same idea. I love this little gift because I remember trying to wash my kids with tiny, thin, cheap washcloths and they just fell into a little ball in my hand. They just didn't work too well. So, I went to Ross (I always go there BEFORE Babies-r-us because they are way cheaper) for some wash cloths. I found a 24 pack for about $3. PERFECT! Then I got a few remnents of flannel from JoAnns, I am seriously lacking in my boy flannel right now, so I had to buy. Anyway, this is what I came up with...

The wash really did a number on this flannel! ALWAYS was your fabric before you sew. I have made cute tops before only to wear them one time. It really stinks when you put all that hard work into something that shrinks and/or changes shape. Anyway, this is nothing a little ironing can't fix.


I think I've mentioned before, sewing squares is my least favorite thing to sew. But when you cut it all at once then streamline your sewing it goes so fast. 10 washcloths in about an hour. Not so bad.

Here are the different patterns I made and the different backings.
All done! I hope you are inspired to hand make a gift today.
I am linking with:
Fireflies and Jelly Beans


I got this idea from another blog that I can't seem to find now. I looked it up on the internet to try to give credit and found tons of blogs with the same idea. I love this little gift because I remember trying to wash my kids with tiny, thin, cheap washcloths and they just fell into a little ball in my hand. They just didn't work too well. So, I went to Ross (I always go there BEFORE Babies-r-us because they are way cheaper) for some wash cloths. I found a 24 pack for about $3. PERFECT! Then I got a few remnents of flannel from JoAnns, I am seriously lacking in my boy flannel right now, so I had to buy. Anyway, this is what I came up with...

The wash really did a number on this flannel! ALWAYS was your fabric before you sew. I have made cute tops before only to wear them one time. It really stinks when you put all that hard work into something that shrinks and/or changes shape. Anyway, this is nothing a little ironing can't fix.

I just put the washcloths upside down on top of the right side of the fleece, pinned it and cut it. Ready to sew. That easy!!

I think I've mentioned before, sewing squares is my least favorite thing to sew. But when you cut it all at once then streamline your sewing it goes so fast. 10 washcloths in about an hour. Not so bad.

Here are the different patterns I made and the different backings.
All done! I hope you are inspired to hand make a gift today.
I am linking with:
Fireflies and Jelly Beans
Subscribe to:
Posts (Atom)