Showing posts with label DIY. Show all posts

Wednesday, March 7, 2018

Fireplace Make over

5 years and I finally updated my fireplace! This is one that I thought long and hard about. I hated the rock from 1964, the weird piece of drywall that came out from it and how it was all off center. Here is the best picture I can find from before we did anything to the house. This is from the walk through when we bought the house.


Here is a couple of pictures to show how we tried to spruce it up because I didn't feel like demoing the rock with all the other projects we had.


I knew I wanted a reclaimed wood wall. My first thought was to take out the drywall then frame out the rock and put the wood on top. Then, I thought about how I love mixing metal and wood. I add metal where ever I can in the house. So, I thought why not cover the rock with wood on the bottom and just frame out on the side. But, my husband was really excited about the idea of the easiest project in the house yet, so he suggested just cover the rock with the metal.


I got some good pallets from a friend and got right to work staining them with my home made stain of steal wool soaked in vinegar. But first apply black tea to make the stain work.


While Dr. C was away at a guys weekend, I covered the dry wall part of the wall.


Rusting the metal was not an easy task! I found some glue to glue it up with. Got some old pallets and made a home made stain for the wood. Picked out some tile for the hearth and got to work on a super simple make over. Here is the end result that I am very happy with.


I am so happy with the way it turned out. There is a little less rust then I was hoping for, but I still love it! Oh yeah, I almost forgot to mention, it was super cheap! Probably the cheapest thing makeover of the whole house.

Kristen

Friday, September 25, 2015

Stairs Before & After

When we bought this house, we noticed right away that the railing shook about an inch on either side. This was a safety project that absolutely needed to be done. I wasn't terribly upset about that though. The 80's oak isn't exactly my favorite wood.


You can also get a good view of what used to be a closet at the top of the stairs. We took that out to make our master shower bigger. You can see that post here. Our hall way was lined with doors and I didn't like that, so that was another reason to get rid of that closet. Don't worry, we have tons of closet space.


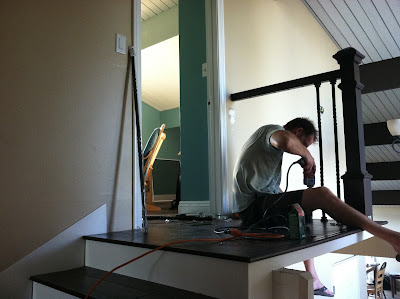
Mr. C started with taking out the railing to put wood on the stairs. That was a big job! I was able to lay wood everywhere else, but I didn't have the patience to even attempt this! (Not to mention, he didn't trust my patience with it as well.)


Home Depot has banisters, railing and the big posts in pine, oak and metal. We went with the pine because I didn't want the wood grain and I wanted the stain to really show up. After staining and sealing the wood parts, Craig got to work on the spindles. We were so happy to see this go up finally about a year after we moved in. The railing came out the week we got the keys, so the top floor was off limits to the kids.


The most difficult part of this project was getting the angle correct on the banister. The top set of stairs was not built to code and they are not quite as tall as a normal step so the angle on the banister is different then standard. I think Mr. C had to buy a new railing and post because of mess ups. He felt like Alexander and the Terrible, Horrible, Very Bad, No Good Day. From what I remember he woke up, tripped on a hole in his jeans, pealed his toe nail off, cut the railing too short, realized the post was cut too short and a lot in between. I wish I could remember it all because it was quite comical.


Here is the finished stairs. Wood with white risers, no more door at the top of the stairs and new railing. I am so happy with the way it turned out. I love Mr. C's suggestion of the white risers. They do get dirty, but they are not hard to clean or touch up with a little white paint.


By the way, this too is a project that is incomplete. You can barley tell, but at the bottom of the top section of stairs there are 2 spindles missing. Your guess is as good as mine for when it will get finished.


Just some more views. This picture you can see the pattern of spindles we choose.


Now we are safe on our stairs again.

Kristen

Friday, August 28, 2015

DIY Black Out - Heat Blocking Window Covering

We have these huge slant windows in our bedroom that go all the way up to the vaulted ceiling. They are so pretty and it is beautiful when they let light in, especially in the winter. But sleep is more important to me then the nice pretty light during the day. Also, in the summer it is just way to hot for that sun to heat up my bedroom first thing in the morning. 

These pull down shades are what the previous owner had.


We never changed them because I was holding out for shutters. I wanted something that I could open and close with some sort of ease. Those windows are so high, nothing is really practical. But those dirty old ridiculous things were just so bad! We had to do something. Mr. C build a frame out of 1 x 1's and I bought some energy star black out curtain lining at JoAnns and stapled it to the frame. It fits perfectly in the window, it is super light and it cost about $24 per window. This is the lining I always use, Roc-lon 100% Blackout Budget Drapery Lining.


The gaps that let light in are all gone around the edges and it is very clean. Except for the missing trim.


Now I just need to get rid of the blue curtains, but only after I figure out some sort of hidden black out that is easy to roll up in the morning and put down at night.


Sunday, August 9, 2015

Kitchen Wall Part 1

I have this long awkward wall in my kitchen that I have just not come up with the perfect purpose until last month. After lots of searching on pintrest and wanting somewhere to display my home canned goods I finally found a couple of ideas I am putting together.

Remember those picture frames I made from old pallets. Here is my project with the rest of the wood.


I just cut up the thicker boards from the pallets and screwed them together to get a little shelf.


Mr. C was worried about all the jars falling out if there was an earthquake so I used some picture hanging wire I found in the garage to help hold things in. I love the look of the wire on it and it serves a purpose. 


Time for canning and lotion making!

Thursday, March 19, 2015

Finished Patio!

Finally! It's time to put some pavers on the ground. I can't believe it. I was so excited to start, I didn't care if it was dark out. This is Monday night.


The pictures don't show much in the dark, here it is Tuesday morning. Since I got this, I asked Dr. C to fix my stove top. 3 of the burners don't light on their own. 


Because I have such a wonderful husband, he went ahead and fixed it. But of course just like always when we take apart something in this house, something it is connected to falls apart. He had to take out the igniter, but the screws were corroded and crumbled. Also, the burner part (of course I don't know what that is called) was all messed up (I also really don't know what was wrong with that.) He had to take apart the entire stove and spend an hour on the phone just order new parts. Since, the parts took a really, really long time to get here, this was my kitchen while we were laying pavers in the back. 

If you give a husband a job, he's going to have to take it apart... If he takes it apart, he will see something else is broke... When he tries to fix that, he will want to make it all like new...  


Tuesday night...


Wednesday...


Thursday afternoon...


Thursday, late afternoon...


Friday, Dr. C told me I would be cutting pavers so we can get the saw back and save money. Really? :-/ I thought I would be just laying the pavers and he can do all the cutting and get all his hands all rough and yucky. But, nope, he had to get stuff done and I had to cut.


Another view of Friday...


Mostly finished... I'm nervous about it being the right height once we pound it flat.


Aren't my cuts beautiful? I can't believe I was able to do it.


Another view. The step isn't done yet, but the main part is done.


Yay!! It worked, we pounded it down and it ended up being completely flush with the step.


Saturday. I'm so glad Dr. C was home to help again. Lots of cutting up here. He got to do most of it. I did just that little part in the front that you see.


There are a few imperfections that I know about, but over all we are happy with it. My hands and aching legs were not happy. But, now that I have recovered, I am happy. I squatted for almost every single one of those pavers!


All lit up at night.


Thursday, January 23, 2014

Picture Frames out of Pallets

I have been thinking about what to put on my stairs forever! Finally I saw some picture frames I loved on pintrest. They looked like reclaimed wood, so I figured I could use an old pallet. Simple, right?


Not as simple as I thought. It's a pain in the rear taking those things apart. My job was much easier when I got ahold of a sawszall. Now I have my nice pretty old wood.


I split some boards when I was trying to take the pallets apart with just a hammer. I used my son's tools to put it back together. It actually worked quite nicely.


I needed the wood to look old and parts of this wood looked new where it was protected. I used apple cider vinegar, black tea and steel wool. It worked great! This picture is after one coat.


Here is an idea of what they will look like. The only problem is once I laid it out, I thought it was going to be too big. I went back to the store for the smaller mats and cut down all the wood for smaller frames.


Now that the frames are done, I taped up where they will go and realized those were too small. Ugh! Back to taking apart another pallet.


Much better.


Yay! Here they are, finally all done!


I love the way they turned out. In the picture it's hard to see the individual pieces of wood, but they look very old.


Now I have 3 smaller frames and don't know what to do with them.


Wednesday, June 20, 2012

Demo - day 2 and 3

It's starting to get a bit overwhelming! Day 2 went really well, then things got added on day 3. Let me just show you...


Do you love that picture? We knew there were roaches because we saw a dead one months ago with a can of raid next to it. When we got the keys, that same roach was in the same spot. Nope, they never picked it up. Monday night we let off 9 roach fumigators in the house and garage. Those are what I found in the entry and kitchen! They were still twitching! Tuesday the fumigation tent went up and Thursday night we will do more roach bombs incase there were any eggs that hatched.

This next picture, I was not posing! Really, I stood up and was kind of helping myself stand because my back was hurting. Maybe I should see my chiropractor. Oh, wait, he is working with me on our house! Maybe he should take a break to adjust me. :-)

See that big hole behind me? It was fun when I started it, but it got a little overwhelming when I couldn't finish it all in an hour. That is the master shower growing into the linen closet. The heater was moved to the attic, so I have the old heater space for a linen closet.


Here is what exploded through the bathroom as we sledge hammered the back of the shower.


Once I gave up, Dr. C decided to finish the job. He was a little better at it then me.


This was a little surprise. A couple me drive up asking if we have any metal, C up there told them to look in our dumpster and come look through the house. We didn't want the counter top or sinks so they took it. That saved us about an hour.


Here is a little extra something that got added. Under the carpet was this spongy sound or insulating board. It was kind of gross, some parts were soggy and we didn't want pee smell coming through. We also didn't know how the wood would lay over it. So, C decided he didn't want it. That was a day project in it self with only 2 people working on it.


Another not so good surprise, under the carpet was this old 70's tile. This room is only about 1/4 cleared of it. SO MUCH TO DEMO! Will it ever be over?


At least C finally hired someone to do work. I am so happy about that. The over grown trees in the back yard are getting cut WAY back and some down completely.


I love that we can see some sky, but not the neighbors. Oh! and there used to be a rotted out deck there where the dirt is darker with 2 huge bougainvillea plants. Thanks Reed!


With the house tented, we are at a stand still till tomorrow. I bought paint today. I can paint the kitchen, but there is still a couple days of demo left. We won't be living in it when we have to move out of here in 10 days. Hopefully we are only a week behind!